Mama Bear's Bounty-Seeds and Sprouts
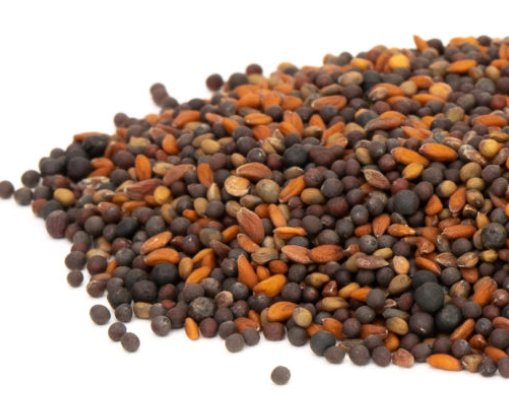
Spicy Microgreen Blend 150 G
Spicy Microgreen Blend 150 G
Couldn't load pickup availability
A spicy blend of Red Mustard, Arugula & Garden Cress. Delicious and very good for you!
Mustard Benefits:
Mustard sprouts are packed with essential vitamins and minerals. Mustard is a powerhouse of protein and a great source of vitamins A, B6, and C, calcium, iron, magnesium, phosphorus, potassium, and amino acids.
Mustard sprouts contain antioxidants and anti-inflammatory compounds like vitamin C and vitamin A that can help boost your immune system and protect against disease.
Mustard sprouts may help regulate blood sugar levels due to their high fiber content. Fiber slows down the absorption of glucose into the bloodstream, which can help prevent spikes in blood sugar levels. This is particularly important for people with diabetes or those who are at risk of developing the condition.
In addition to their fiber content, mustard sprouts also contain compounds called polyphenols, which have been shown to have anti-diabetic properties. Polyphenols are antioxidants that can help protect the body against oxidative stress, which can contribute to the development of diabetes. Studies have shown that consuming foods that are high in polyphenols can help improve insulin sensitivity and reduce the risk of developing type 2 diabetes.
Arugula microgreens are a nutrient-dense food that offers a range of potential health benefits. Here are some of the health benefits of arugula microgreens:
Rich in nutrients: Arugula microgreens are packed with vitamins and minerals, including vitamin C, vitamin K, folate, calcium, and potassium.
Loaded with antioxidants: Arugula microgreens are rich in antioxidants, which can help protect the body from damage caused by free radicals.
Help lower inflammation: Arugula microgreens contain compounds that may help lower inflammation in the body, which is linked to a range of chronic diseases.
Support heart health: Arugula microgreens may help support heart health by reducing cholesterol levels, improving blood pressure, and reducing inflammation.
Strengthen bone health: Arugula microgreens are a good source of calcium, which is essential for bone health. They also contain vitamin K, which is important for bone density and may help reduce the risk of osteoporosis.
Support digestive health: Arugula microgreens contain fiber, which is important for digestive health. They may also help promote the growth of beneficial gut bacteria.
Contain anti-cancer properties: Arugula microgreens contain compounds that may have anti-cancer properties. Studies have found that arugula may help inhibit the growth of cancer cells in the body.
Benefits of Garden Cress:
Medicinal Properties
Both the leaves, stems and seeds of garden cress are used in preparing traditional medicine, for example, the seeds are used as a remedy for minimizing asthma symptoms as well as improves lung function in people suffering from asthma. Also, garden cress can be used for treating patients suffering from bleeding piles.
Menstrual Cycle Regulation
The garden cress seeds contain phytochemicals that are similar to estrogen, therefore, consuming them helps to make irregular menstruation become more regular.
Indigestion
Garden cress seeds can be eaten to relieve the symptoms of constipation and indigestion.
Respiratory Infection Treatment Garden cress seeds can be chewed or blended and mixed with honey, which is taken as an expectorant for treating cold, headache, asthma, sore throat and cough.
Iron Deficiency Treatment
Garden cress seeds are used for treating patients suffering from iron deficiency anaemia. Consumption of these seeds helps to boost the haemoglobin level over time.
Culinary Purposes
Garden cress is characterized by peppery, aromatic and tangy flavour. It can be eaten raw in salads and sandwiches or used as herbs for food seasoning. The seeds can also be roasted with salt before eating.
Dermatological Treatment
Garden cress seeds can be blended with water and honey to form a thick paste that can be applied on the skin to treat sunburn, irritated skins, dry skin and broken lips.
Hair Loss Treatment
Garden cress is an excellent source of protein and iron thus can be used for treating people suffering from hair loss.
Immunity Boost
Consumption of both garden cress stems, leaves and seeds help to boost the immune system.
Milk Production Consuming garden cress helps to stimulate the mammary glands to start producing milk in lactating mothers. Due to this powerful property of garden cress, new mothers are encouraged to eat food containing garden cress to facilitate milk production. Moreover, due to the high protein and iron contents of garden cress, it is ideally given post-partum to breastfeeding mothers.
Aphrodisiac
Consumption of garden cress greatly helps to improve and boost libido.
Gastrointestinal Treatment
Garden cress can be used as a laxative and purgative for patients suffering from constipation. Garden cress seeds can be blended and mixed with honey, which is used for treating diarrhoea and dysentery. Garden cress can be blended and infused with hot water, which is used for treating colic, especially in children.
Anti-carcinogenic
Garden cress seeds have antioxidants that help to prevent free radicals from damaging the body cells. Due to this property, it can serve as a chemoprotective drug for protecting the body from cancerous growths.
Nutritional Values of Garden Cress
Garden cress is an excellent source of folic acid, vitamins C, dietary fibre, iron, calcium, protein, vitamin A, folate and vitamin E. The seeds of garden cress are also highly nutritive and they contain ascorbic acid, tocopherol, folic acid, calcium, linoleic fatty acids, iron, beta-carotene and arachidic.
Memory Booster
Garden cress seeds contain arachidic fatty acid and linoleic acids thus can serve as a memory booster.
Side-effects of Garden Cress: Not for everyone.
Diuretic Properties
Garden cress contains diuretic properties thus patients suffering from frequent passage of water and urine should be cautious when using this plant.
Abortifacient Properties
Garden cress is abortifacient in nature thus capable of inducing abortion in early pregnant women if taken in excess. Pregnant women should refrain from eating garden cress as it has the tendency to induce uterine contractions and abortion. Garden cress seeds can increase uterine contraction, thus certain people use it to induce labour in late stages of pregnancy.
- Days to Sprout: 8-10
- Soak Time: DO NOT SOAK
- Storage: To prolong viability, it is best to store them in the fridge. If you store your seeds in the freezer, they’ll last indefinitely!
Grow Microgreens! (no soil)
No Soak, mist only.
Fit a heavy duty unbleached paper towel, coffee filter, or Baby Blanket to your sprouter of choice- on a plate, porous surface like a terracotta pot bottom or tray with grid holes in the bottom of it.
Mist paper towel so the seed will stick to the surface when you spread them.
Sprinkle the seed in one thin layer so after misted and taken up the water, the seeds will be one seed beside the other. Use spoon or other tool to separate clumps.
Mist seed on the towel 2x in the first hour or two to be sure it has started to hydrate. Pour off pooled water.
Place sprouter in a vented plastic bag and return it after every rinse.
Rinse/mist twice daily.
Once the seed is stuck to the paper mist more aggressively. Use enough water to prevent roots from browning or water from a slow-moving tap.
Drain off any excess water with each rinse. Tap the sprouter to release water from the holes. Drain off excess water on your plate.
Grow & Harvest
By day 3 the sprouts have raised above the towel and start to free themselves from the towel. At this time, you can decide to take the towel out or let the roots grow into the towel in a day or two. If you choose to scrape the sprouts off the towel carefully water under the tap gently until you harvest on day 5, 6 or 7. The gelatinous nature of the hulls, make them susceptible to mold so eat the sprouts soon after harvest.
If you chose to leave the sprouts to grow into the towel, water until the new shoots are tall enough to cut with scissors above the roots- probably day 7 to 9.
Cress is the only gelatinous seed you will be able to put in a bowl of water and float some of the hulls off of if you want to. There is lots of fiber in the hulls and there are advantages to eating the whole sprout.
Enjoy!
Grow Microgreens!
Soil Method
You will need:
• 10” x 20” gardening trays (1-inch-tall preferred), 1 with
holes + 1 without. Smaller microgreen trays also work well.
• Good quality organic starting soil mix
• Parchment paper or unbleached paper towel (optional).
• Dome lids (clear or black) or plastic sheet
• Organic seed
• Mister bottle, cup measures, garden spray nozzle (optional)
• Scissors or sharp knife
1. Don’t soak small or medium size seed. Small seed such as broccoli and arugula are easier to sprinkle on top of the soil if they are not soaked.
2. Prepare Soil
Add water to top of the bag (or each tray) 12 hours ahead of use until almost fully hydrated. Rehydrate the bag as necessary. If you were to put the soil in your hand and squeeze it, you should not be able to get much more than a drop of water out of it for the perfect moisture content. If you want to mist the seed after putting it on the soil, reduce the water hydration of the bagged soil a bit.
TIP: To check for overwatering, tip the tray to one end. Water should not pool enough to drip out of the tray.
3. Fill Trays with Soil
Use a tray with holes. Fill with 3/4-1.5” of soil. The closer to the top of the tray the better aid to air circulation. Use a block or your hand to smooth and flatten the soil without compacting it. The back of a tablespoon or spatula smooths out the valleys. You can wait to put the tray without holes under until after unstacking/uncovering or add it to the bottom now.
TIP: Place a layer or two of paper towel on the bottom of the tray before adding soil for easier cleanup.
4. Sow the Seed
Sprinkle the seed evenly over the soil in the tray (pizza cheese shaker, spoon). The seeding density depends on the stage at which you’re planning to harvest. For small seeds for 1-week microgreens, start with approximately 15 -28 grams (1.5 – 2 Tbsp). Sow slightly less seed for 2-3 week microgreens.
Seeds do not need misting if the soil has enough moisture. Mist if you need more moisture. Use a spray bottle or a garden spray nozzle set to light mist. The soil should be moist throughout, but not soaking wet.
5. Cover the Seed
Doing away with soil as a seed cover decreases the work and time it takes to grow the greens. If stacking the trays on top of each other, use a cover directly on the seed like parchment paper, a plastic sheet or wet unbleached paper towel layer. When not stacking trays, the seed will need protection from drying out by using a dome/lid. Use a clear dome or an inverted 10 x 20” tray without holes. For smaller trays, use several layers of unbleached paper towels folded onto itself with or without a plastic sheet covering the top.
TIP: Most microgreens will grow taller when you keep the light out at the beginning, but this may make the stem weaker. Most seeds germinate in the light no problem.
6. Stack Trays or Cover with Lids
Stacking helps to quickly force the roots into the soil, provides darkness, promotes even germination/growth. Stack 2-5 filled trays on top of each other with an empty tray on the top of the stack with a weight in it. Check at least once a day to see if the trays need water. Cabbage family seed sprouts quickly, so stack for 2-3 days. Others stack 3-5 days.
If choosing not to stack, simply cover the trays with clear or black-out plastic, a lid or dome. Check at least once a day to see if the trays need water. Cover for the same number of days as above.
7. Expose to Indirect Sunlight, Florescent/LED or Grow Lights.
After 2-5 days, the microgreens should be ready for light. If the microgreens begin to get quite tall and leggy, this is an indication that they may need a bit more light.
8. Water the Growing Microgreens
Check the seed once or twice daily and water as needed. The soil should be moist, not wet. Once trays are unstacked, add water from below into the no holes tray as necessary.
9. Harvest!
Microgreens are harvested at 1-3 weeks with scissors or a sharp knife. Make sure microgreens are not damp before storing. If needed, you may use a small fan or salad spinner to dry the microgreens before storing in a sealed container in the fridge.
Instead of harvesting all at once, you can start to harvest microgreens as soon as the first two leaves are spread out. Take only what you need for your meal and allow the rest to keep growing or put the tray in the fridge loosely covered and a plastic bag or dome to harvest another day. Water as necessary.
10. Enjoy!
Microgreens make everything better, so have fun with them and add them to your favourite dishes!
Helpful tips:
• To moisten your bag of soil, add water ahead until almost fully hydrated.
• The roots grow under the soil so it works well to water from below if the tray has holes in it, or open the side of the tray and pour water beside the soil when using flexible plastic trays. Otherwise misting or watering from the top works well too.